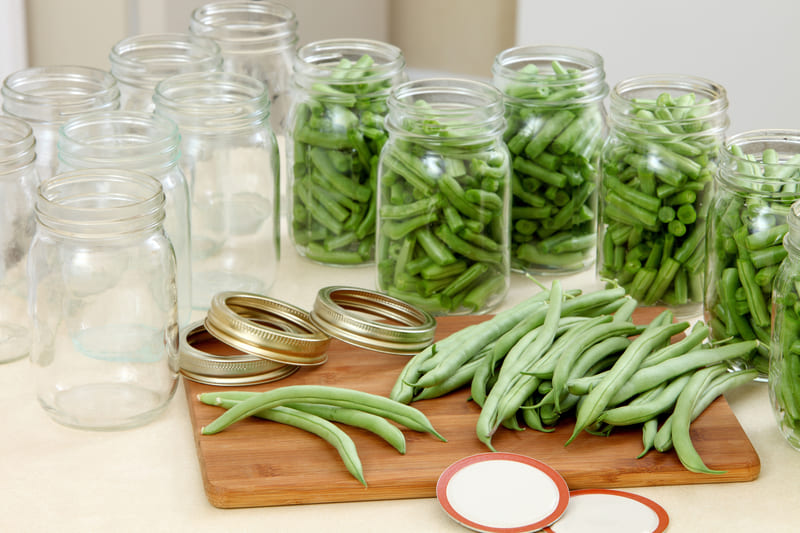
If you thought to can your green beans instead of purchasing them already canned, you came to the right place. In this guide, we will show you how you can green beans without a pressure canner or any other complicated tools.
Step-By-Step Guide To Canning Green Beans Without A Pressure Canner
Get your beans ready and let’s start canning them. You will need jars, salt, a pickled mix, and water to complete this process.
Step 1: Wash Your Green Beans
Washing the green beans before canning them is a crucial step. Soak them in cold water and make sure to get rid of all the dirt or residue that might be on them.
Check your beans with a critical eye as you don’t want any bacteria in the canned jars. Once your beans are washed, you will have to drain them well so you have no extra water.
Step 2: Cut Them Into Smaller Size Bites
Depending on the size of your beans, you might have to cut them into smaller pieces. Cut both ends of your beans if they are not cut already and decide on the length you want them to have.
The most popular length that people prefer when it comes to canned beans is one inch. But feel free to cut them to the length you want.
Step 3: Add Salt To The Jars
Wash the jars diligently and add some salt to the bottom of them, before you add your beans. You don’t have to add too much salt, as only half of a teaspoon is enough for a pint jar.
The best salt you want to use is sea salt and stay away from iodized salt for this step. In canned beans, salt has the purpose to preserve their quality for a longer time.
Step 4: Choose Your Method
There are two ways you can store your beans. You can either store them cold or cooked.
The cold pack method involved using raw green beans and simply adding them to the jar. The hot pack method will require you to boil your green beans before you add them to the jar and can them.
Don’t boil your beans for more than five minutes as you still want to preserve their firm and somewhat crunchy texture. After you boil them, drain them well before you add them to the jars.
Step 5: Cover The Jar Beans With The Pickled Mix
When your beans are in the jars, you will need to cover them with a layer of pickled mix. Because you are not using a pressure canner you will need to pickle your beans to can them.
Beans are not acidic and they require vinegar to make up for the lack of acidity that will help them to conserve over time.
Your pickled mixture could be made of vinegar, water, and salt. However, you can add other spices such as curry or chili if you want these types of flavors to your green beans.
Mix equal parts of vinegar and water, with a pinch of salt and other spices, and pour it on top of the beans.
Step 6: Seal Them With An Airtight Lid
Sealing the jars of canned beans is very important as well.
You want to press the beans with a spoon to make sure you release any trapped air inside of the jar before adding the lid.
Seal them securely and wipe the jars as liquid might spill on the outside surface when you press your green beans inside tightly.
Step 7: Give Your Bean Jars A Hot Bath
Boil water in a container big enough for all your jars of green beans.
You want to place the jars in hot water for about five minutes. If your jars are bigger, you might need to let them sit in hot water for up to ten minutes.
Step 8: Let The Jars Cool And Store Them
Take your jars out of the water and allow them to cool down.
You can store them in a dark place with a constant room temperature. Once you open one of the green beans jars, you can place it in the fridge for up to 4 days but you can’t recan it.
Is It Safe To Can Green Beans In A Water Bath?
It is safe! However, make sure to use a pickled mixture on top of them because you will need the vinegar acidity in order to conserve them for a longer time.
The water bath canning method is used in many households. However, note that this is not a scientific method. To apply this method you will need to place your green beans jars into a container with water and bring it to a boil.
The water should cover the jars by one or two inches. When the water inside the canner comes to a complete boil, the pressure is considered high enough to complete the canning process.
From this point, you will just have to take your jars out and store them.
What Can I Use If I Don’t Have A Pressure Canner?
The water bath method works great if you don’t have a pressure canner. However, you can also use the step-by-step process above to get your green beans canned securely.
We suggest using pickled mix even if you apply the water bath method, so you can increase the lifespan of your food even more.
However, there are many recipes that include different ingredients to your canned foods, so you will have to consider your personal preferences as well.
Can You Cold Pack Green Beans?
Raw beans are safe to can without boiling or cooking them in any way. However, if you do that, make sure you cut the beans into smaller pieces and remove both of their ends.
At the end of the canning process, there is no significant difference between using cold green beans and using hot green beans. But it might be a difference in terms of taste and texture.
Pre-cooked beans tend to be softer and have a milder flavor compared to raw beans. On the other hand, pre-cooked beans also tend to combine with the rest of the seasonings to add to the jar easier than raw beans.
Ultimately, it is up to you which method you choose according to your personal taste.
Do You Have To Cook Green Beans Before Canning?
Cooking beans before canning them is not a necessity but it can be an option if you want a milder flavor and a softer texture. Ultimately, whether you cook your beans before you can them or not, the canning process will remain the same.
If you decide to pre-cook your beans before you can them, you shouldn’t overboil them as they will become too mushy and not conserve very well.
Moreover, cooked beans lose a significant amount of nutrients, which is another factor you want to consider.
How Long Are Canned Green Beans Good For?
If you can your green beans correctly, you can store them for up to 3-5 years. To maintain your jars at optimum quality, it is crucial to not open them unless you are planning to eat them.
Also, store them in a dark place, with no direct sunlight. You want your jars to stay at a temperature that is not too hot yet not too cold, which is why room temperature is ideal for storing your canned food.
If you follow these instructions, you should be able to store your canned green beans even longer than the mentioned shelf life.
Lastly, make sure all jars are airtight sealed so no moisture or foreign bacteria gets inside them. Foreign bacteria can compromise the storing process of your canned beans and they will go bad a lot faster.
Conclusion
You want to consume your canned green beans with meat such as steak or fish and even use them as an ingredient in your soups and stews.
Canned green beans can enrich the flavor of salads as well and you can eat them plain if you want a healthy snack.
When you add canned green beans to any dish, consider the fact that they have a mild taste of salt and vinegar, so you will have to adjust the rest of the ingredients accordingly.
By following this guide, you will end up with the best canned green beans, without having to use a pressure canner and you will be able to enjoy them for many years to come.
So, it is an investment well worth making as long as you do it correctly and you respect all the hygiene norms so you can have a safe meal along with your friends and family.
2 comments
Thans for the recipe I am doing the water bath.
Could you please give me a recipe for canning green beans. I loves all your directions